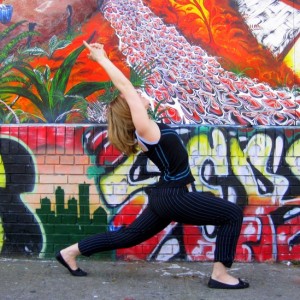
Crescent Lunge Arm Variations

The typical arm position for a crescent lunge is arms extended upwards, shoulder width apart, with the palms facing each other. Changing up the arms up arms targets different muscles and make your practice more interesting.

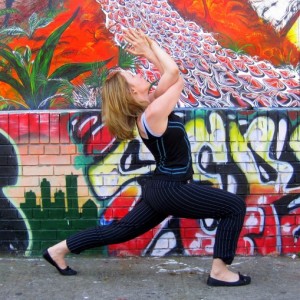
For your base in crescent lunge, make sure the front knee bends so that it points in the same direction as the second toe. Keep the knee above the ankle (you may need to adjust the length of your stance to achieve this). The back toes are tucked under, and the back knee can be either on the floor or lifted. Find length up through the spine, and contract the core muscles (low abs, low back, and pelvic floor). If you are strong and flexible, you may add a backbend. Make sure you don’t collapse into the low back; imagine bending backwards over a big inflatable exercise ball. From here you can try a number of arm variations:

1. Instead of keeping the arms shoulders’ width apart, press the palms together, interlace all ten fingers, then release the index to point upwards. The arm variation promotes shoulder flexibility, and gently stretches some of the upper back muscles.

Fingers interlaced

Interlace all ten fingers, then release to index to point upward.

2. Find eagle arms.  To do this, give yourself a big hug, walking the hands as far back as possible. If you can’t get the hands far enough back to stack one elbow on top of the other, stay here, you’ll get a nice upper back stretch. If you’re going farther, keep the elbow where they are, and bring the backs of the hands toward each other. If you have the flexibility, your hands are actually going to pass by one another, with the bottom hand closer to your face. Feel free to stop and hold the position at any point along the way. Finally, if you can, bring the palms of the hands together, forming a “twisted prayer” with the arms. To deepen into eagle arms, extend the hands forward and the elbows upward. You will feel a stretch in the shoulders and across the upper back.

Eagle arms

Crescent lunge with eagle arms.

An interesting transition into this one is to start in eagle, then unwind the top leg to step straight back into crescent lunge. From crescent lunge with eagle arms, you could transition straight into warrior three with eagle arms.

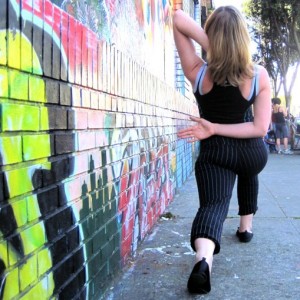
3. This one stretches a little more into the chest. Place the hand on the same side as the back leg on the back of your neck, opening the elbow backwards. Take the opposite forearm across the low back with the palm facing away from your body. This is a nice gentle stretch for the chest and shoulder muscles, and also gets into the upper back a little bit. This position also provides a more support for people with weaker core muscles.

Back view of one hand across the low back and the other on the back of the neck.

Crescent lunge with one hand across the low back and the other on the back of the neck.

Make sure that whatever you do on one side, you balance out on the other side.
Revolved Hand-To-Foot

Revolved hand-to-foot pose (parivrtta hasta padangusthasana) combines a standing balance, a hamstrings/low back stretch, and a twist. The full pose with the leg extended takes quite a bit of flexibility, but if you keep the knee bent, you still get the balance and the twist.

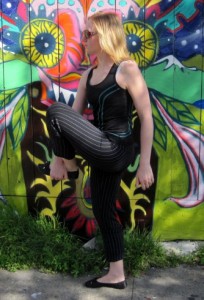
Start standing in mountain pose. Ground into the right foot, preparing to lift the left foot off the ground. Contract the abdominals, low back, and pelvic floor, and as you inhale, lift the knee toward the chest. With the opposite hand, grasp the outer edge of the foot.

Grasp the outer edge of the foot

Grasp the outer edge of the foot


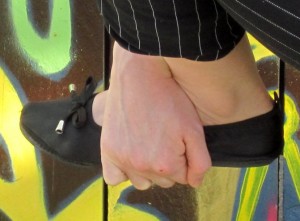
The thumb should be toward the heel. If you don’t have the flexibility to reach the foot, grasp the knee instead. Find your balance. Breathe.

Thumb toward the heel

The thumb should be toward the heel

Now, if you have the flexibility, begin to straighten the left leg. Keep breathing. Keep the foot flexed, pressing out through the heel. If you’ve rounded through the spine at all, try to straighten it out, lengthening upwards through the crown of the head. Use the upper back muscles to draw the shoulders back instead of letting them collapse forward. Remember, you can always keep the knee bent if that’s better for your body. Find your balance.

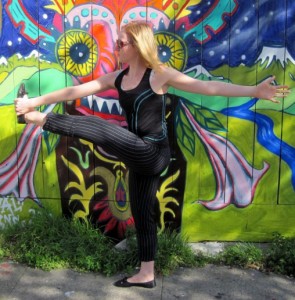
Now, under control, inhale and extend the left hand backwards at shoulder height. Slowly open the chest to the left, twisting through the spine. Breathe.

Revolved hand-to-foot with gaze forward

Extend the left leg forward and the right arm back.

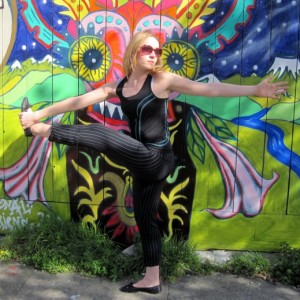
Once you feel stable, you can slowly turn the gaze toward the back hand. It’s always easier to balance if you have a focal point, so as your gaze travels backward, keep choosing different points to fixate on. Contract the quads (muscles in the front of the thigh) and hamstrings to maintain balance. Keep breathing.

Revolved hand to foot

Revolved hand to foot

Hold this pose for at least three breaths, and then repeat it on the other side.

One-Leg Crow Variation

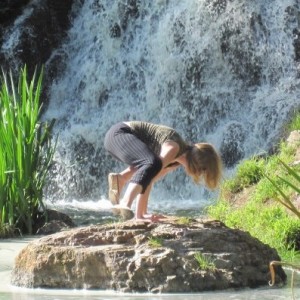
There are at least two variations on one-leg crow (eka pada bakasana), but this is a good starter variation because it gives the “unused” leg a little more support, and doesn’t require as much back strength as sending the leg straight out behind. Because it gets you comfortable having one leg for support instead of two, it is a good prep pose for more challenging variations. Before exploring one one-leg crow, get comfortable with crow pose: make sure you can hold it for at least 8 breaths (which means you have to actually breathe as you hold it!)

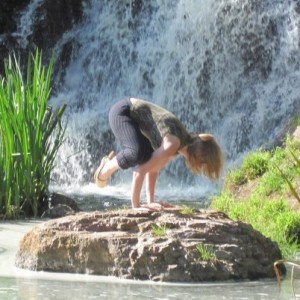
Here we go: begin in crow. Make sure the abdominals are contracted, rounding the low back. Keep the gaze slightly forward on the floor to keep from toppling forward. Squeeze the heels up toward the buttocks. Breathe.

Crow

Crow Pose.

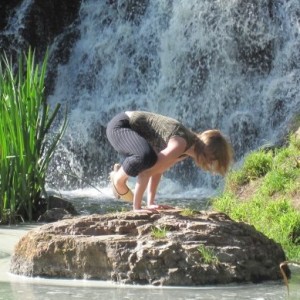
Normally in crow pose, you’d keep the hips up high, but in preparation for bringing the leg forward, exhale and lower the hips slightly. This will allow you to counter-balance better. Keep the abdominal muscles contracted.

Lower the hips.

Lower the hips.

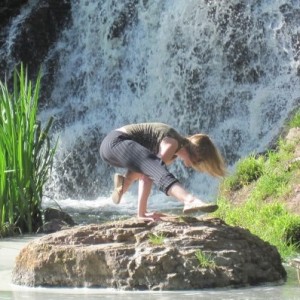
Now, shift your weight into the leg that’s going to stay in the crow position. Use the inner thigh muscles to squeeze the inner knee into the triceps (muscles in the back of the upper arm). Feel the other leg get a little lighter. Contract the lower back muscles, outer hip muscles, and buttocks and, and on an inhale,  begin to slowly pivot this other leg around and forward. Try not to let the foot touch down. Keep the knee resting against the triceps as a pivot, and squeeze the inner thighs toward each other for more support.

Begin to bring the leg around.

Begin to bring the leg around and forward.

Keep breathing. Keep moving slowly: transitioning too quickly will throw you off balance. Use the chest and upper back muscles to squeeze the arms in toward each other. If the elbows bow out to the sides, you lose your base. As the leg comes around out front, contract the low abs, hip flexors (muscles in the front of the hips), and quads (muscles in the front of the thighs) to extend the leg forward. Breathe.

One-leg crow

One-leg crow

If you want a challenge, reverse the transition and return to crow, making sure to contract the core muscles and keep the breath flowing. From there, you can transition straight into the other side. Otherwise, from one-leg crow, you can let the feet float to the ground and take a break before returning to crow to do the other side.

Pushing Up To Plank

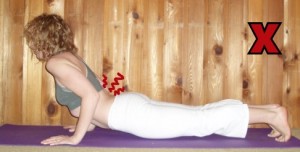
Yoga teachers often avoid getting their yogis to push up from their bellies to plank pose, because it is so challenging to do correctly. Yogis must have the triceps strength to push the whole body, as a unit, up into plank, and they need the core strength to be able to stay flat as a board from the shoulders all the way down to the heels. If a yogi with weak triceps or core muscles is determined to push up, they will often compensate by letting the hips sag down as they lift the shoulders. This puts the low back in a dangerous position where it may easily be injured. Since the core muscles are not strongly contracted in this position, the weight of the legs and hips hangs off the connective tissue in the low back instead of being supported by the muscles.

Avoid letting the hips sag down.

Lifting the shoulders first and letting the hips follow behind is a common mistake when pushing up.

Here’s a way to avoid putting the low back at risk; instead of leading with the shoulders, we’re going to lead with the hips. Start laying on the stomach, hands palms-down underneath the shoulders with the fingers spread. Squeeze the elbows into the sides of the body. Now tuck the toes under. As you inhale, contract the quads (muscles in the front of the thighs), hip flexors (muscles in the front of the hips), and lower abdominal muscles so that the knees and hips lift off the floor.

Lift the thighs

Contract the quads, hip-flexors, and lower abs so the knees and hips lift off the floor.

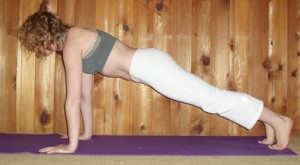
Looking at the two photos above, you may think they put the low back in equally awkward positions. The difference is, in the second picture, the core muscles are active, which takes the strain out of the connective tissue in the low back.

To help out the core muscles, step the toes forward just a touch. The feet shouldn’t be so far forward that the hips stick up when you reach plank, but if they’re too far back, it makes the hips more likely to sag at you push up. You should feel like you have a strong base of support. Now, as you exhale, squeeze the elbows in to the sides of the body and lift the chest off the mat, coming into chuttarunga.

Chuttarunga

Exhale, squeeze the elbows in to the sides of the body and lift the chest off the mat.

If the triceps are weak, the tendency is to bow the elbows out to the sides or slide the shoulders up toward the ears. Try to avoid this. Use the chest, shoulder, and upper back muscles to keep the elbows tight. Use the upper back muscles to slide the shoulder blades down the spine toward the hips. Keep the abdominals contracted, and continue straightening the arms until you’re all the way up in plank. Breathe.

Plank

Plank Pose

Using this progression to transition from the belly to plank pose makes lower back injuries much less likely.

Turbo Dog

Nothing strikes fear into the hearts of yogis like adding “turbo” to the beginning of a pose’s name, and turbo dog probably deserves that apprehension. It is a variation on downward facing dog that targets the triceps (muscles in the back of the upper arms). Pretty simple instructions: start in downward facing dog, and as you exhale bend into the elbows so that they hover just above the floor. Don’t touch the elbows down or you lose the tricep strengthening. Contract the muscles in your shoulders, upper chest, and upper back to keep your elbows from bowing out to the sides; keep your arms parallel. Always keep the abdominals contracted, and, other than the variation in the arms, maintain good down dog form.

Turbo dog

Turbo dog