Dancing Cat

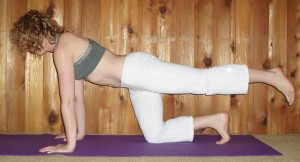
Dancing cat is a great way to strengthen low back muscles without hyper-extending the spine, which can be uncomfortable for many people. Start on all fours. As you inhale, extend your left leg behind you.

Leg extended

Inhale entend the leg out behind.

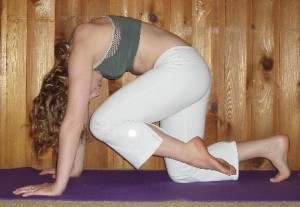
As you exhale, draw the knee toward the nose and the nose toward the knee underneath the body. Round the spine as if finding cat pose  to fire up the abdominals.

Knee to nose, nose to knee.

Bring the knee in toward the nose and the nose in toward the knee.

As you inhale, extend chest bone forward and the left leg back, noticing how your low back muscles contract.

Repeat this three to eight times, then switch sides.

Yoga For Cyclists

I recently taught a Yoga For Cyclists workshop at Mission Cliffs, and I wanted to put some suggestions out there for those of who couldn’t make it, and a refresher out there for those of you who did!

Cyclists tend to have short, tight chest muscles and tense, but overstretched, upper and lower back muscles from continually hunching over their handle bars (for more details on this, see my recent blog post on getting to the root of upper back tension). To stretch the chest muscles and give the upper back muscles a chance to relax, try this prone shoulder opening twist. To strengthen upper and lower back muscles, try locust pose.

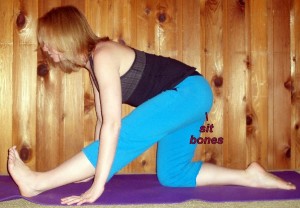
Cyclists can develop tight hips, which may contribute to lower back soreness. To stretch tight hip flexors, quads, and hamstrings, consider moving through the following sequence on both sides, holding each of poses for at least thirty seconds:

Sit bones tilted back

Half splits.

To stretch the outer hip muscles try pigeon pose or thread the needle. It is important to stretch the outer hip muscles as these muscle can contribute to tension in the IT band (a long strap of connective tissue running from your hip to below your knee), which can cause problems in both the hip and the knee.

It is also important to maintain strong core muscles to have healthy form while cycling. As mentioned above, locust will help strengthen your low back. Holding plank pose will strengthen all the core muscles at once.

I hope that gives you some stuff to try at home for now. I will be offering the Yoga For Cyclists workshop again soon at Mission Cliffs, so keep your eyes out for it!

Pushing Up To Plank

Yoga teachers often avoid getting their yogis to push up from their bellies to plank pose, because it is so challenging to do correctly. Yogis must have the triceps strength to push the whole body, as a unit, up into plank, and they need the core strength to be able to stay flat as a board from the shoulders all the way down to the heels. If a yogi with weak triceps or core muscles is determined to push up, they will often compensate by letting the hips sag down as they lift the shoulders. This puts the low back in a dangerous position where it may easily be injured. Since the core muscles are not strongly contracted in this position, the weight of the legs and hips hangs off the connective tissue in the low back instead of being supported by the muscles.
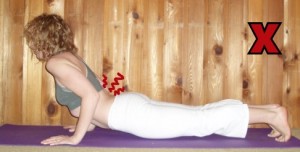
Avoid letting the hips sag down.

Lifting the shoulders first and letting the hips follow behind is a common mistake when pushing up.

Here’s a way to avoid putting the low back at risk; instead of leading with the shoulders, we’re going to lead with the hips. Start laying on the stomach, hands palms-down underneath the shoulders with the fingers spread. Squeeze the elbows into the sides of the body. Now tuck the toes under. As you inhale, contract the quads (muscles in the front of the thighs), hip flexors (muscles in the front of the hips), and lower abdominal muscles so that the knees and hips lift off the floor.

Lift the thighs

Contract the quads, hip-flexors, and lower abs so the knees and hips lift off the floor.

Looking at the two photos above, you may think they put the low back in equally awkward positions. The difference is, in the second picture, the core muscles are active, which takes the strain out of the connective tissue in the low back.

To help out the core muscles, step the toes forward just a touch. The feet shouldn’t be so far forward that the hips stick up when you reach plank, but if they’re too far back, it makes the hips more likely to sag at you push up. You should feel like you have a strong base of support. Now, as you exhale, squeeze the elbows in to the sides of the body and lift the chest off the mat, coming into chuttarunga.

Chuttarunga

Exhale, squeeze the elbows in to the sides of the body and lift the chest off the mat.

If the triceps are weak, the tendency is to bow the elbows out to the sides or slide the shoulders up toward the ears. Try to avoid this. Use the chest, shoulder, and upper back muscles to keep the elbows tight. Use the upper back muscles to slide the shoulder blades down the spine toward the hips. Keep the abdominals contracted, and continue straightening the arms until you’re all the way up in plank. Breathe.
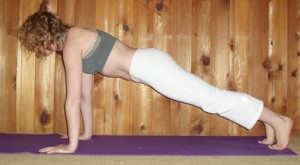
Plank

Plank Pose

Using this progression to transition from the belly to plank pose makes lower back injuries much less likely.
Monkey Tail

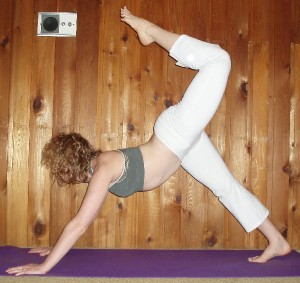
There are quite a few variations on hip flexion and extension flows from down dog. Here’s one called Monkey Tail. Start in Downward Facing Dog. As you inhale, lift one of the legs up toward the ceiling, bending into the knee as you lift. As you do this, pull the chest bone towards the front of your mat and look forward. Pay attention to the low back as having the knee bent makes it easy to arch the back too far. If you feel any discomfort, back off. As you lift the leg, head, and chest, you build strength and flexibility in the muscles along the whole spine.

Inhale lift the leg

Inhale, lift the leg

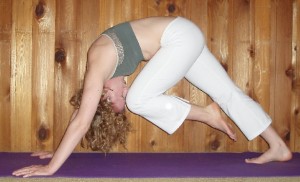
As you exhale, bring the knee in toward the nose, and nose in toward the knee. As you do this, you continue to work the low back muscle, and as you complete the crunch, you use your abdominal muscles as well.

Exhale, knee in toward to nose, nose toward the knee.

Exhale, knee in toward to nose, nose toward the knee.

Repeat for anywhere from 3-12 breaths, depending on how you’re fitting it into your practice. Make sure you balance it out on the other side!