Half Hero Upward-Facing Bow Variation

If you’re comfortable in upward facing bow (also known as wheel or urdhva dhanurasana) and half supine hero pose, (ardha supta virasana) why not combine them?

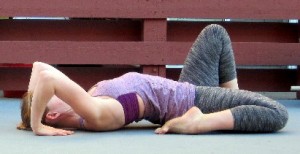
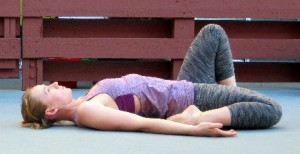
Begin in half supine hero. If you cannot get onto your back comfortably in reclined half hero, keep working with other comfortable modifications on half hero rather than going on to the variation described below.

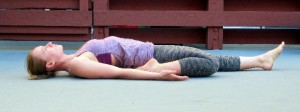
Half Hero

Half Hero

Bend your extended leg so the sole of the foot in on the floor and the heel is underneath the knee (most people can graze the heel with the hand in this position).

Half Hero with Bent Knee

Half Hero with Bent Knee

Place the hands palms-down above the shoulders on the mat, fingertips pointed toward the shoulders. Breathe.

Half Hero Preparing to Life to Upward Facing Bow

Half Hero Preparing to Life to Upward Facing Bow

On an inhale use the strength of you arms and legs to lift up and place the crown of your head on the mat. The sole of one foot should be on the floor, and the top of the other should be on the floor. Take your exhale to readjust the hands and feet so that the thighs are hips-width apart with the knees and feet pointed straight toward the front (or back) of your mat, and so that the hands are shoulder width apart with fingers pointed toward the front of your mat.

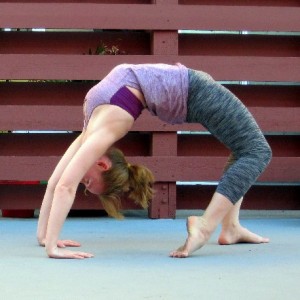
On your next inhale push into the hands and feet to lift all the way up into upward facing bow. Keep the thighs parallel, pressing into the big toe of the foot. To avoid letting the elbows wing out to the sides, draw them toward one another. As you lengthen into your arms and legs, send the tail bone toward the front of your mat and the chest toward the back of your mat to maintain length in your low back. Breathe.

Upward Facing Bow Half Hero Variation

Upward Facing Bow Half Hero Variation

To release, on an exhale, tuck the chin and bend into the knees and elbow to lower back into reclined half hero under control. Then, repeat on the second side.
High Lunge Twist and Bend

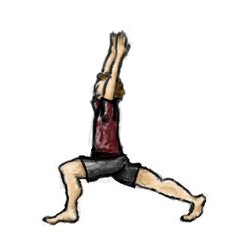
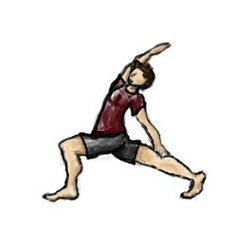
I recently attended a yoga class in which the instructor had us flow through this twisted backbend variation on high lunge, and I just loved it! Start in high lunge with the left leg forward and right leg back, making sure the left knee is right above the ankle pointed toward the second toe of the foot. Keep the back leg long without locking the knee, and press back through the back heal. Breathe.

High Lunge

High Lunge

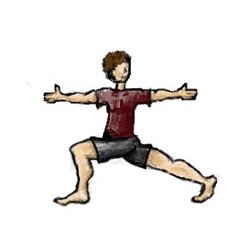
If this next bit feels a little awkward, you’re probably doing it right. Keep your base strong and on an exhale, lower the arms to shoulder height, extending the right arm forward and left arm back, thumbs up toward the ceiling. Twist the chest toward the left, and turn the gaze toward the back hand, if that’s available to you. Keep contracting the obliques (the side abdominal muscles) and resist the urge to lean forward. Breathe.

Upright Revolved High Lunge

Upright Revolved High Lunge

Contract the abdominals, and on an exhale, lower the left hand down to the back thigh and turn the right palm skyward. Inhale, extend the hand upwards so that the palm of the hand faces the back of the room. As you exhale, begin to back bend to your degree. Keep breathing.

Reversed Twisted High Lunge

Reversed Twisted High Lunge

To get to the same sequence on the other side from here, inhale out of the backbend, exhale to windmill the hands all the way down to the floor, and cycle through a two- or one-legged vinyasa. From downward facing dog, step the right foot forward and inhale the arms up into high lunge.

Half Twist Switches

Switching from half twist (ardha matsyendrasana) on one side to half twist on the other side can be kind of cumbersome, so here are two graceful transitions for switching sides.

The first option is to do a pivot-turn to get to the other side. It’s easier than it looks! Once you’ve completed the twist on the first side, look in the other direction to guide your turn. Keep the feet exactly where they are, and turn the body. Allow the feet to pivot until you come all the way around to the front again. Sit your buttocks down between your heals for half twist on the other side.

Switcheroo

Keep the feet exactly where they are, and pivot around to the other side. (click for larger image)

The first time I saw this next transition, I thought it was totally ridiculous, but it’s actually kind of fun. After you complete the twist on the first side, bring the hands in front of you on the mat, and come into a tripod headstand with the legs crossed. In tripod headstand switch the cross of the legs. When you come back down, you’ll be ready for half twist on the other side.

Tripod Headstand Transition

Come into tripod headstand with the legs crossed, and switch the cross of the legs. (click for larger image)

Okay, so maybe that one wont be immediately graceful, but it’s certainly an interesting variation.

One-Leg Crow Variation

There are at least two variations on one-leg crow (eka pada bakasana), but this is a good starter variation because it gives the “unused” leg a little more support, and doesn’t require as much back strength as sending the leg straight out behind. Because it gets you comfortable having one leg for support instead of two, it is a good prep pose for more challenging variations. Before exploring one one-leg crow, get comfortable with crow pose: make sure you can hold it for at least 8 breaths (which means you have to actually breathe as you hold it!)

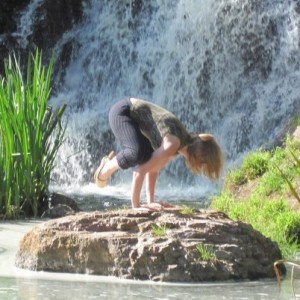
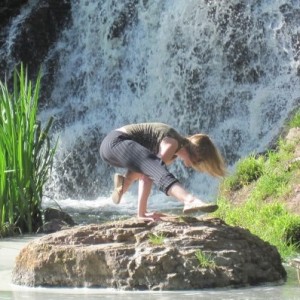
Here we go: begin in crow. Make sure the abdominals are contracted, rounding the low back. Keep the gaze slightly forward on the floor to keep from toppling forward. Squeeze the heels up toward the buttocks. Breathe.

Crow

Crow Pose.

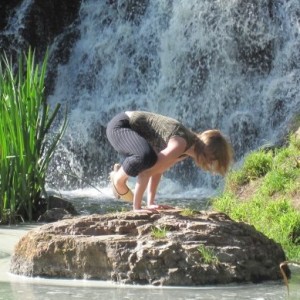
Normally in crow pose, you’d keep the hips up high, but in preparation for bringing the leg forward, exhale and lower the hips slightly. This will allow you to counter-balance better. Keep the abdominal muscles contracted.

Lower the hips.

Lower the hips.

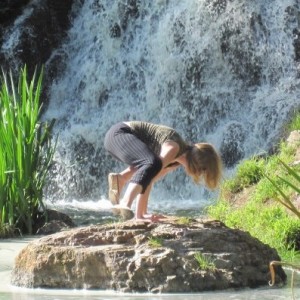
Now, shift your weight into the leg that’s going to stay in the crow position. Use the inner thigh muscles to squeeze the inner knee into the triceps (muscles in the back of the upper arm). Feel the other leg get a little lighter. Contract the lower back muscles, outer hip muscles, and buttocks and, and on an inhale,  begin to slowly pivot this other leg around and forward. Try not to let the foot touch down. Keep the knee resting against the triceps as a pivot, and squeeze the inner thighs toward each other for more support.

Begin to bring the leg around.

Begin to bring the leg around and forward.

Keep breathing. Keep moving slowly: transitioning too quickly will throw you off balance. Use the chest and upper back muscles to squeeze the arms in toward each other. If the elbows bow out to the sides, you lose your base. As the leg comes around out front, contract the low abs, hip flexors (muscles in the front of the hips), and quads (muscles in the front of the thighs) to extend the leg forward. Breathe.

One-leg crow

One-leg crow

If you want a challenge, reverse the transition and return to crow, making sure to contract the core muscles and keep the breath flowing. From there, you can transition straight into the other side. Otherwise, from one-leg crow, you can let the feet float to the ground and take a break before returning to crow to do the other side.

Pushing Up To Plank

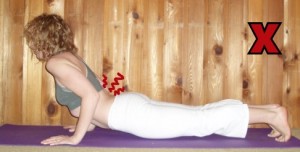
Yoga teachers often avoid getting their yogis to push up from their bellies to plank pose, because it is so challenging to do correctly. Yogis must have the triceps strength to push the whole body, as a unit, up into plank, and they need the core strength to be able to stay flat as a board from the shoulders all the way down to the heels. If a yogi with weak triceps or core muscles is determined to push up, they will often compensate by letting the hips sag down as they lift the shoulders. This puts the low back in a dangerous position where it may easily be injured. Since the core muscles are not strongly contracted in this position, the weight of the legs and hips hangs off the connective tissue in the low back instead of being supported by the muscles.

Avoid letting the hips sag down.

Lifting the shoulders first and letting the hips follow behind is a common mistake when pushing up.

Here’s a way to avoid putting the low back at risk; instead of leading with the shoulders, we’re going to lead with the hips. Start laying on the stomach, hands palms-down underneath the shoulders with the fingers spread. Squeeze the elbows into the sides of the body. Now tuck the toes under. As you inhale, contract the quads (muscles in the front of the thighs), hip flexors (muscles in the front of the hips), and lower abdominal muscles so that the knees and hips lift off the floor.

Lift the thighs

Contract the quads, hip-flexors, and lower abs so the knees and hips lift off the floor.

Looking at the two photos above, you may think they put the low back in equally awkward positions. The difference is, in the second picture, the core muscles are active, which takes the strain out of the connective tissue in the low back.

To help out the core muscles, step the toes forward just a touch. The feet shouldn’t be so far forward that the hips stick up when you reach plank, but if they’re too far back, it makes the hips more likely to sag at you push up. You should feel like you have a strong base of support. Now, as you exhale, squeeze the elbows in to the sides of the body and lift the chest off the mat, coming into chuttarunga.

Chuttarunga

Exhale, squeeze the elbows in to the sides of the body and lift the chest off the mat.

If the triceps are weak, the tendency is to bow the elbows out to the sides or slide the shoulders up toward the ears. Try to avoid this. Use the chest, shoulder, and upper back muscles to keep the elbows tight. Use the upper back muscles to slide the shoulder blades down the spine toward the hips. Keep the abdominals contracted, and continue straightening the arms until you’re all the way up in plank. Breathe.

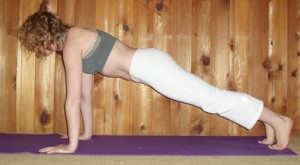
Plank

Plank Pose

Using this progression to transition from the belly to plank pose makes lower back injuries much less likely.