Scissors

The other day in class, someone asked me if we could do “I don’t know what it’s called… ‘scissors?'” and gave me a quick demo.
“Oh!” I said, “You mean Eka Pada Koundiyanasana II”
“Yeah… what does that translate to?”
“Errr… let’s just call it scissors” (For those of you who are interested, it is usually translated to “Pose Dedicated to the Sage Koundinya II”–which is actually more of a mouthful than the Sanskrit name!)

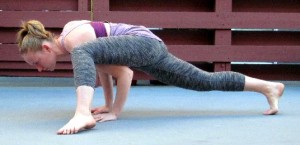
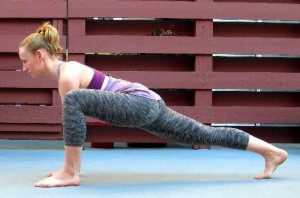
An arm balance by any other name would feel just as empowering, so let’s just call it scissors and move on! Begin in lizard with the left leg forward and the right leg back, both hands are on the big toe side of the front foot. Keep the front  knee bent right above the ankle. Keep the back knee lifted, lengthening the back leg and pressing back through the heel.

Lizard

Begin in Lizard.

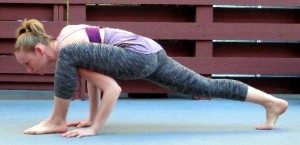
If you feel a deep stretch, stay right here and enjoy it! If you’d like to go further, bend into the elbows, and bring the left arm underneath the left knee. Keep hugging that left thigh in toward the midline of your body. The closer you can get to drawing your shoulder underneath the thigh, the easier it will be to hold your arm balance. Now, plant the hands underneath the shoulders and draw the elbows toward one another. Your right elbow can either nestle in under the right hip to help support your body weight, or it can stay to the side of the hip for more of a challenge. As with any arm balance, keeping the arms parallel is key; if you let the elbows bow out to the sides, you will lose your support and fall out of the arm balance.

Eka Pada Koundinyasana II Prep

Draw the left shoulder underneath the left knee, sliding the left hand leftward.

Keeping the arms as they are and the left knee drawing in toward the midline, heel-toe the left foot to the left. You want to rotate the leg so that the big toe side of the foot is on the floor, and the inner thigh is resting on top of the upper arm. If you keep the hamstring (back of the thigh) on the upper arm, it becomes difficult to get into this posture without substantial flexibility.

Eka Pada Koundinyasana II Prep

Heel-toe your left foot to the left, rotating the left inner thigh onto the back of the upper arm.

Now bend deeply into the elbows, draw the chest way out in front of the hands, and turn your gaze the left. If you shift the weight far enough forward, the back foot will gently float off the floor. Keep the back leg strong, pressing out through the ball of the foot and spreading through the toes. When you first experience this arm balance, your face may come quite close to the floor. As you become more stable, work on lifting up through the chest and drawing the shoulders back.

Eka Pada Koundinyasana II with Knee Bent

Bend the elbows deeply and shift the weight forward until the back foot floats off the floor.

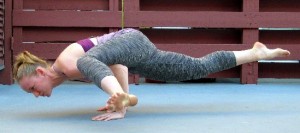
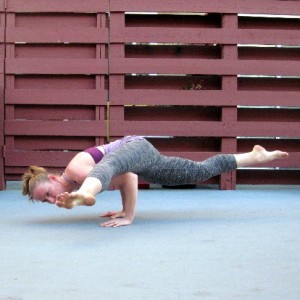
Once you become stable here, extend the left leg forward. Keep both legs strong, reaching out in opposite directions, to keep integrity in your arm balance. Keep your breath flowing and see if you can relax the face.

Eka Pada Koundinyasana II

Straighten into the front leg for full Eka Pada Koundinyasana II.

Gently release back to lizard and switch sides to prepare for “scissors” with the right leg forward.
Refining Your Hamstring Stretches

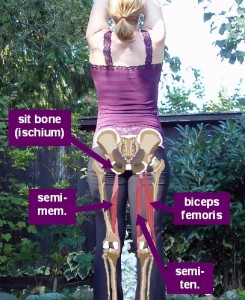
Okay, bear with me for a bit of anatomy here: although we often think of the hamstrings as one muscle, it is actually group of three muscles: the biceps femoris, the semimembranosus, and the semitendinosus. All these muscles have slightly different orientations.

Hamstrings

The Hamstrings start at the sit bones, and are made up of three muscles.

In general, all the hamstring muscles start at the sit bones and end up attaching into the lower leg bones. So, to stretch them, you have to get the sit bones and lower leg bones as far away from each other as possible. Some ways to do this is are straightening the leg at the knee or bringing the thigh in toward the chest, which draws the lower bones farther away from the sit bones. Another way to do it is to tilt the sit bones away from the lower leg bones–this happens naturally when you hinge the torso forward toward the thigh.

Based on this info about the anatomy of the hamstrings, here are a couple tips for refining your hamstring stretches:

1. For a deeper stretch, actively tilt the sit bones away from the lower leg bones.

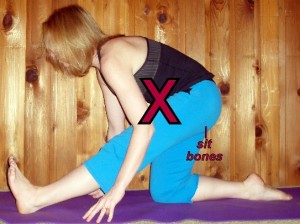
In some poses, such as half splits, you have quite a bit of control of how you tilt the pelvis. If you keep the sit bones tucked under, you are taking some stretch out of the hamstring muscles and sending it into the low back muscles.

Sit bones tucked under

Half splits with sit bones tucked under.

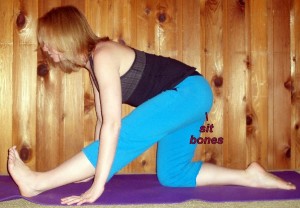
To maximize the hamstring stretch, think about contracting your low back muscles to tilt the sit bones toward the back of your mat.

Sit bones tilted back

Half splits with sit bones tilted back.

This tip can be applied to downward facing dog and standing forward bend as well. Even in a seated forward fold, you can “walk” the sit bones back.

2. You don’t have to straighten at the knee to get a good hamstring stretch.

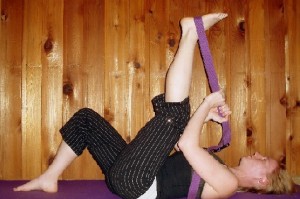
The hamstrings are one of the few muscle groups in the body that cross two joints: the hip and the knee. For those of you who are sensitive behind the knee, you’ll be happy to know that you don’t necessarily have to straighten the knee to get a good hamstring stretch–work from the hip joint instead. For example, if you’re doing a hamstring stretch laying on your back, you can focus more on bringing the thigh in toward the chest than straightening the knee. Find a balance between these two actions: you should feel a stretch in the back of thigh without feeling discomfort behind the knee.

Knee bent

Hamstring stretch with bent knee.

In this pose, it’s easy to let the sit bones and tail bone curl up upwards, which can take away from your stretch. For a deeper stretch, lengthen the bottom leg out along the mat, so your legs make an ‘L’ shape from the side.

3. Rotate the legs to stretch different hamstring muscles.

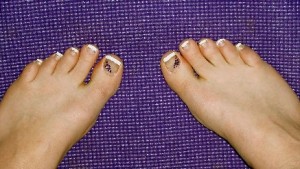
The hamstring muscles are all stretched best at different leg orientations.  The biceps femoris is stretched best when the thighs are rotated medially (think toes turned in toward the midline of the body). The semimembranosus and semitendinosus are stretched best with thighs rotated laterally (think toes turned out away from the midline).

Toes turned in.

Having toes turned in stretches the biceps femoris.

Next time you do a standing forward fold, experiment with toes turned in and toes turned out and find out where you hold your tension.